Getting started with G-Cubed
Table of contents
Options for running G-Cubed
G-Cubed can be run in many ways including:
- On the G-Cubed Cloud servers;
- On a Github Codespace that allows you to use Visual Studio to work with a dev container running on a Github cloud server; or
- As a dev container within Visual Studio on your own computer.
Running on the G-Cubed Cloud
Commercial users of G-Cubed are encouraged to run G-Cubed on the G-Cubed Cloud, to provide the best combination of performance and security. Reach out to us if you wish to migrate to the G-Cubed Cloud.
G-Cubed running on a Github Codespace
Users are also able to run G-Cubed models on a Github Codespace (a server hosted by Github). This is the standard way to use the publicly available demonstration G-Cubed model with 2 regions and 2 sectors (G-Cubed model 2R).
Github Codespaces do not currently appear to run in Chrome Browsers. They have been tested successfully in Safari, Edge, Firefox, and Opera Browsers. Our recommendation is to use Github Codespaces with VS Code as the front end rather than relying on a web browser as the front end.
If you do not use a Github Codespace for 30 days, it will be deleted by Github, irrevocably losing any changes that you have made and not preserved in the Github remote repository using
git. Github will send you warnings by email but these can be easily ignored. If you are using Github Codespaces, **make sure to save any changes you make in the codespace by usinggittopushyour changes to the remote repository (Using git).
To create a suitable Codespace:
- Create an account on Github.
- (Only for the public G-Cubed 2R model, with 2 symmetric regions and 2 sectors, fork its Github repository by loading the webpage for the repository in your browser and then tapping on the
forkbutton near the top right of the repository’s landing page.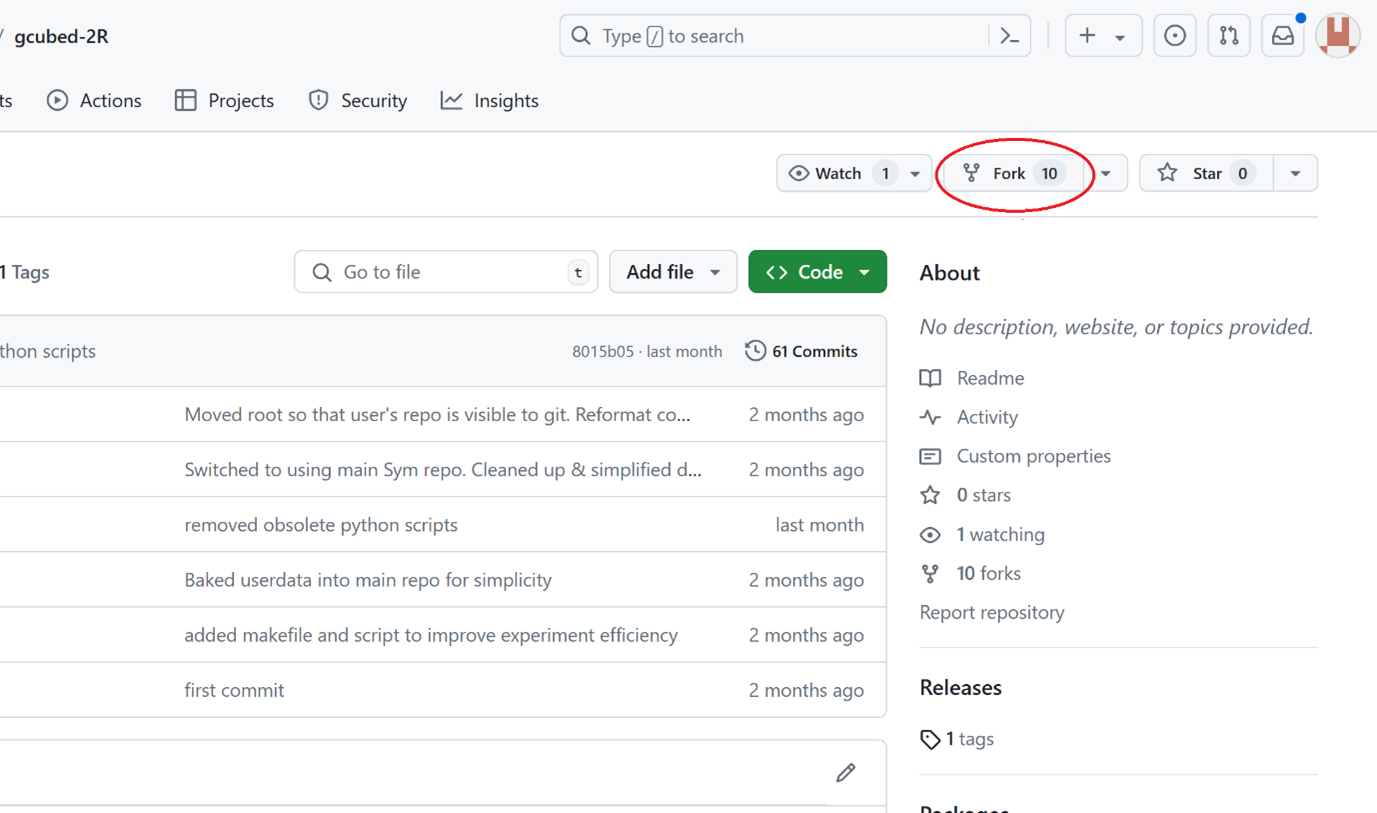 This will create a copy of that repository in your own Github account and it will link that copy to the original repository so that you can benefit from any changes made to that original repository. It is important that you fork the repository rather than cloning it directly because you will not be able to preserve your own work by pushing it back to the original repository. You need your own fork of the repository to manage your own changes using Git. Forking the repository will also ensure that any changes to the original repository will be easy for you to integrate into your forked repository.
If you are using a production version of G-Cubed set up in a private Github repository (not gcubed.com-model-2R), then you MUST NOT fork the repository. Instead just proceed to the next step.
- Navigate to the
Codetab of your forked repository and click on the greenCodebutton.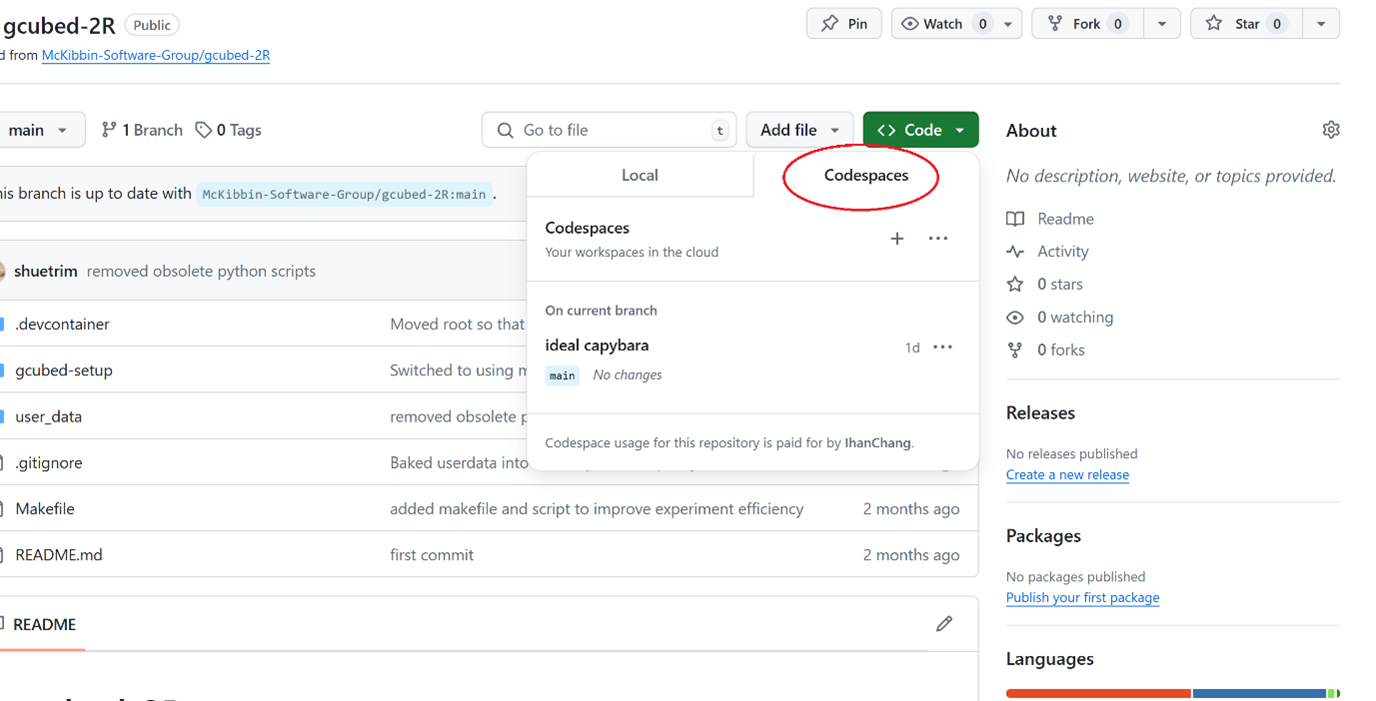 This will open a dropdown menu.
 - Click on the
Open with Codespacesoption and then create a new Codespace using your copy of the repository.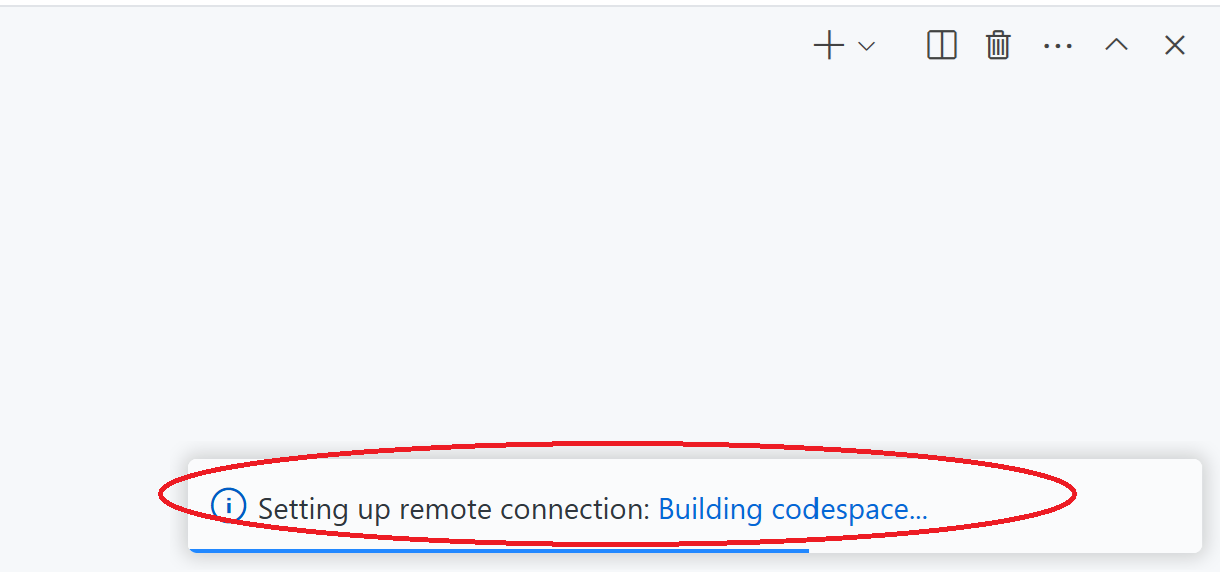
At this stage you have created a virtual computer running on Github servers. If you run this computer for long enough each month, then Github will charge your account. However you do get a reasonable number of CPU hours of free usage each month on the smallest virtual computer that they offer (2 CPUs). After that, you will be charged for the time that you use the virtual computer. You should consult the Github documentation for billing details.
The first time the virtual computer is created, it will take a minute or two to set up because it:
- Downloads the source code for the SYM processor and compiles your own optimised version of the SYM processor.
- Sets up VS Code in your browser window.
- Installs the VS Code customisations required by G-Cubed.
- Installs a copy of the files that make up the G-Cubed model.
Once the virtual computer is ready, you will be able to access it in your browser window that will be showing the VS Code user interface. You can VS Code in your browser to run the G-Cubed model.
How will you know that you are ready to use the G-Cubed model? Your browser window will display your VS Code and you will see a welcome screen. There will be no blue clock icons superimposed over the icons on the left of the VS Code display (they show as VS Code sets various things up). Once you virtual computyer is ready, you will be able to open and edit any of the files in your copy of the G-Cubed model.
When you are finished with the virtual computer, perform the following sequence to ensure that the virtual machine stops when your work session is done and your work is safe:
- Save all changes to files.
- Push your changes to your Github repository using git, either at the commandline or by using the source control capabilities of VS Code.
- Click the blue-background Codespaces ‘button’ in the bottom left status bar of VS Code to reveal the Codespaces menu.
- Click the
Stop Current Codespaceitem on that Codespaces menu to shut down the virtual machine. - Close the browser tab.
Just closing the browser window will leave the virtual machine idling in the background and using up your CPU budget.
It is important to push your changes to the Github repository because Codespace drives are still somewhat ephemeral. Not only do they auto-delete after 30 days inactivity, but there are no Service Level Agreements or availability guarantees – your data could just evaporate at any time (e.g. because of a hardware failure). Use the usual Git commands.
Once your changes have been pushed to your Github repository, you can delete the Codespace. When you are ready to start work again, you can just create a new virtual machine using your Github repository and all of your changes will be available to you on your new virtual machine.
Working with Codespaces
A Github Codespace is a virtual computer, running on Github servers, that provides you with the ability to work with a G-Cubed model, customising the model, setting up simulation experiments, and running those experiments. The Codespace is running what is referred to as a dev container. Learn about using dev containers in Github Codespaces.
When you are ready to start working with G-Cubed, go to Github Codespaces and select the G-Cubed Codespace to resume. It will be in the list of Codespaces that are owned by you.
Note that you can scale the size of the virtual computer that you are using. The default size is the smallest virtual computer that Github offers (2 CPUs). You can change this by clicking on the elipsis ... icon on the right of the Codespace and selecting the option to change the machine type. You have the option to run a 2 CPU machine with 32 GB of RAM or a 4 CPU machine with 32 GB of RAM. For large G-Cubed models, with many sectors and regions, the 4 CPU machine will run the model considerably faster than the 2 CPU machine. If you want an even larger machine type, you need to request that directly from Github support. Typically the memory demands of larger G-Cubed model versions require a 4 CPU machine to ensure that the model does not run out of memory and terminate experiments early. 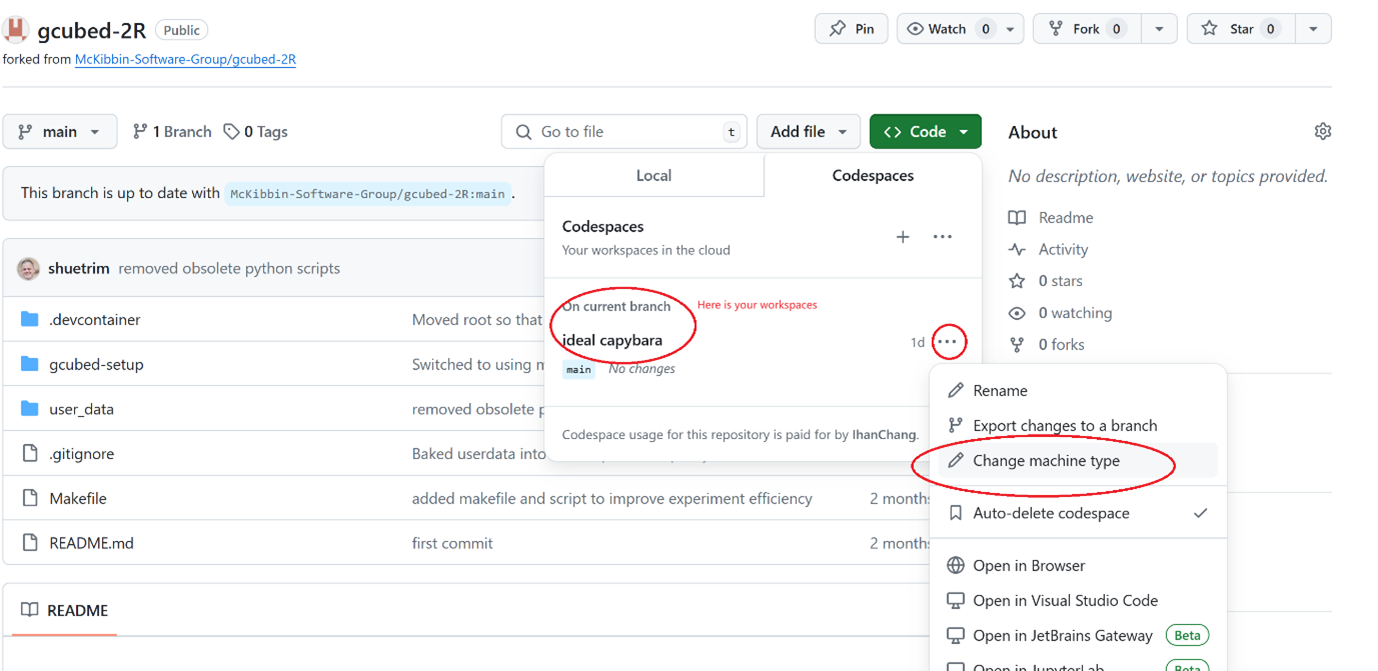
Your data on the Codespace virtual computer
Any changes that you make within a codespace (creating new files or editing existing ones) are only stored in that Codespace unless you act to save the changes permanently. Codespaces are ephemeral and can be deleted by Github if they are not used for 30 days or more. To make sure that your changes are saved permanently and can be worked with again in a new Codespace if that is ever needed, make sure you use git to push your changes from the Codespace to the Github repository. The necessary operations can all be performed via the Visual Code user interface or at the terminal command line.
Your workspace in the cloud will contain a folder called /2R/197. This folder has a path that reflects the model version and build.
The G-Cubed model folder contains the model configuration CSV file (e.g. configuration.csv) and several folders:
templates- contains G-Cubed reporting templates.data- contains the data files that are used by the model.python- contains the Python scripts that are used to run simulation experiments.sym- contains the SYM files that define the model variables, parameters and equations.
Once you run the model, there will also be a diagnostics folder that contains various CSV files that can be used to do diagnosis when you have questions about how the model experiment has progressed.
You can download files from your Codespace to your own computer and you can drag and drop files from your own computer into a Codespace.
What if Github Codespaces does not suit your needs?
If you cannot or prefer not to use Github Codespaces or the G-Cubed Cloud, you can still run G-Cubed on your own computer. Detailed instructions are provided for setting up G-Cubed on your local computer.
Contact the G-Cubed team if your systems requirements or IT security arrangements warrant a more tailored approach to installing and running G-Cubed.
Running dev containers on your own computer
It is possible to use a dev container on your own computer instead of on a Github server (Codespace). This is useful if:
- you need to work offline;
- you want to use a more powerful computer than the one that you have access to in Codespaces;
- you need to run G-Cubed on your organisation’s own remote server infrastructure;
To run a dev container on your own computer, follow the instructions for the operating system running on your own computer.
G-Cubed experiment results
The results produced when you run an experiment will be available to you in the /results folder. This folder is created when you run your first experiment. This folder will contain a subfolder for each model run that you have performed. The path to the results folder will be named after the model version, build and the Python script that implemented the experiment (e.g. results/<MODEL>/<BUILD>/<EXPERIMENT_NAME>). That folder will contain a log file and a number of CSV files containing the economic projections produced by the experiment.
By default, your Codespace is configured to not push experiment results to your Github repository. This is because the results can be very large and can quickly breach storage limits on Github repositories. If you do want to store the results in your repository, you can change the configuration in the .gitignore file in the root of your repository. You can remove the line that ignores the /results folder and then push the changes to your repository.
Updating G-Cubed
G-Cubed is under active development and new versions of the model are released regularly. Updates can be made directly to the model itself or to the Python G-Cubed software that runs the model or to the SYM processor that is used to preprocess the SYM files that define the model.
Before doing any updates, preserve your work by pushing all changes to the origin (remote) git repository.
Updating the 2R model itself
In the first step to set up G-Cubed, you will have forked the gcubed.com-model-2R repository to create a new public repository that is owned by your own Github account. Because your repository has been forked from the gcubed.com-model-2R repository, changes to the gcubed.com-model-2R repository can be pulled into your own Github repository using the features of Github web interface. Those changes will update the main branch of your own repository. You can then use Git commands to merge the changes into whatever branch you are working with in your own repository.
This will ensure you have the latest versions of the model data, SYM files, configuration, chartpacks and experiment examples.
Updating the G-Cubed software
You can update your version of the Python G-Cubed software or the SYM processor when those tools are updated.
-
Open your dev container (do so from the Github Codespaces page https://github.com/codespaces/ if using Github Codespaces).
-
Save your work (this is not actually needed when doing an upgrade of G-Cubed software but it is good practice). At the terminal prompt enter the commands:
If you have not done so already, configure global behaviour of
gitto merge in remote changes (highlighting any conflicts) rather than overwriting local files:
git config --global pull.rebase false
Pull down changes to files from the remote backup of the repository on Github, merging them into your existing model files:
git pull
Copy your own file changes to the remote backup of the repository on Github:
make push
You will be prompted to enter a short description of the changes you are saving. Once you hit
ENTER, the changes will be saved to the remote backup of the repository on Github.
-
Trigger a dev container rebuild from within VS Code. This is done by running the VS Code task called
Dev containers: Rebuild Without Cache and Reopen in Container. This task can be found in VS Code by typingCommand + SHIFT + Pin macOS orCTRL + SHIFT + Pin Windows to access the task list and then typing rebuild to find the right task. Click on the task to run it. Alternatively, if using a Github Codespace, click on the blue button in the lower left corner (the one you use to close dev container) and select theRebuild Containeroption from the menu of options that are shown. Either approach will cause the dev container to be recreated while keeping all of the data (e.g. results and experiments) in your existing Codespace intact. -
Once the dev container has rebuilt, regenerate the model baseline, making sure that you have deleted any previously created
picklefiles from your results folders.
Learning to use Git
Some of the operations above use Git, a powerful but complex tool for version control of text documents (source code and, for us, data files). VS Code does provide quite a bit of help with using Git, but understanding Git itself is helpful. You are strongly encouraged to explore the resources linked from our brief explanation of Git as part of preparing to work on G-Cubed projects.
Accessing updates to G-Cubed
From time to time there will be updates to the G-Cubed model or the software used to run it.
Instructions on doing updates to G-Cubed cover updating both the model and the software.